中安拓也のブログ

プログラミングについて書くブログ

個人的にまぎらわしいCSSのセレクタ

イントロ

数あるCSSセレクタのうち、意味がごっちゃになりやすいものをメモした。

タイプセレクタとclassセレクタの併用

次の例では、タイプセレクタのliとclassセレクタの.itemを続けて記述している(間に半角スペースを含めてはいけない)。<li>タグのclass="item"の要素のみにスタイルが適用される。

li.item {
  font-weight: bold;
}
<p class="item">更新のお知らせ</p>
<ul>
  <li>おまけ</li>
  <!--下記要素のみにスタイルが適用される-->
  <li class="item">ハッピーセット</li>
</ul>

子孫コンビネータ(子孫セレクタ)

複数のセレクタを組み合わせて、ある要素の子要素または孫要素を選択するのが子孫コンピネータ。 次の例では、<ul>に含まれる<li>にだけマッチしてスタイルが適用される。

ul li {
  font-weight: bold;
}
<ul>
  <!--style適用範囲 start-->
  <li>ハッピーセット</li>
  <li>ラッキーセット</li>
  <!--style適用 end-->
</ul>
<ol>
  <li>妖怪ミニカー</li>
  <li>妖怪グラス</li>
</ol>

直下セレクタ(子セレクタ)

複数のセレクタを組み合わせて、ある要素の子要素のみを選択するのが子孫コンピネータ。 次の例では、<ul>に含まれる<li>にだけマッチしてスタイルが適用される。

ul > li {
  font-weight: bold;
}
<ul>
  <!--style適用範囲 start-->
  <li>ハッピーセット</li>
  <li>ラッキーセット</li>
  <!--style適用 end-->
</ul>
<ol>
  <li>妖怪ミニカー</li>
  <li>妖怪グラス</li>
</ol>

セレクタのグループ化

セレクタをグループ化すると、1つのスタイル宣言に対して複数のセレクタを割り当てることができる。次の例では、<p><li>の両方にマッチしてスタイルが適用される。

p, li {
  font-weight: bold;
}
<!--style適用範囲 start-->
<p>お知らせ</p>
<!--style適用 end-->
<ul>
  <!--style適用範囲 start-->
  <li>妖怪ミニカー</li>
  <li>妖怪グラス</li>
  <!--style適用 end-->
</ul>

下記の本を参考にした。

ngForm内に別ComponentのFormを含めるとvalueが取得できない

イントロ

ngForm内に、別コンポーネントで定義したテキストフィールドや、セレクトボックスを含めると、Sendボタンで送信するときに、valueを取得できないという問題に直面した。

開発環境

  • Angular@2.4.1

  • typescript@2.0.10

デモアプリケーション

  • テキストフィールドは、ngFormと別コンポーネントで定義している

  • コンソールを見ると、別コンポーネントで定義しているテキストフィールドのvalueも取得できていることがわかる

f:id:l08084:20161231221509p:plain

ngDefaultControlで解決

ngDefaultControlを入れたら解決した。理屈はわかってないので、後で調べる。

  • src/app/app.component.html
<form #f="ngForm" (ngSubmit)="onSubmit(f)" novalidate>
  <div class="form-box">
    <input-text name="text1" [(ngModel)]="text1" ngDefaultControl></input-text>
    <input-text name="text2" [(ngModel)]="text2" ngDefaultControl></input-text>
    <input-text name="text3" [(ngModel)]="text3" ngDefaultControl></input-text>
    <button type="submit" class="btn btn-primary">Submit</button>
  </div>
</form>
  • src/components/input-text/input-text.component.ts
import { Component, Input } from '@angular/core';
import { NgForm } from '@angular/forms';

@Component({
  selector: 'input-text',
  template: `
  <input type="text" class="form-control" [(ngModel)]="value">`,
  styleUrls: ['./input-text.component.scss']
})
export class InputTextComponent {
}

上記ソースコードは、下記URLに格納してます。

github.com

angular2-google-mapsで渋滞状況の表示

イントロ

前前回の記事で作成した、angular2-google-mapsのデモアプリに、渋滞状況表示のデモを追加した。

開発環境

  • Angular@2.4.1

  • angular2-google-maps@0.17.0

  • typescript@2.0.10

渋滞状況の表示(traffic layer)とは

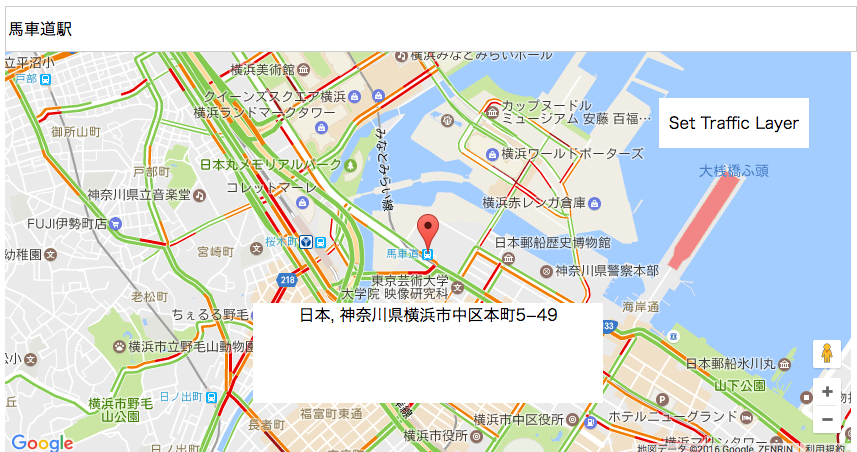
道路の混雑状況を色で表示する(空いていれば緑、混雑していれば赤)、Google Mapの機能。

渋滞状況表示のデモ

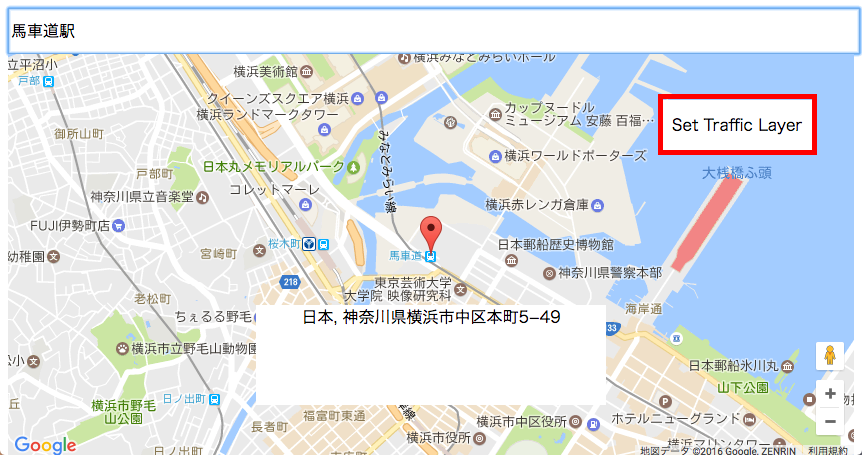
  1. 「Set Traffic Layer」と記載されたボタンを押下

  2. Google Map上に渋滞状況が表示される

渋滞状況表示前 f:id:l08084:20161230162902p:plain

渋滞状況表示後 f:id:l08084:20161230162918p:plain

ソースコード

  • src/app/app.component.ts
import { Component, OnInit } from '@angular/core';
import { NgForm } from '@angular/forms';
import { MapService } from '../services/map.service';

@Component({
  selector: 'app-root',
  templateUrl: './app.component.html',
  styleUrls: ['./app.component.css']
})
export class AppComponent implements OnInit {
  lat: number = 35.6329007;
  lng: number = 139.8782003;
  zoom: number = 15;
  address: string = '';
  trafficSwitch: number = 0;

  constructor(
    public mapService: MapService,
  ) {}

  public ngOnInit() {
    this.getAddress();
  }

  public geocoding(f: NgForm) {
    let self = this;

    this.mapService.geocoding(f.value.address).then(
      rtn => {
        let location = rtn[0].geometry.location;

        self.lat = location.lat();
        self.lng = location.lng();

        // call reverse geocoding
        self.getAddress();
      }
    );
  }

  public getAddress() {
    let self = this;

    this.mapService.reverseGeocoding(this.lat, this.lng).then(
      rtn => {
        self.address = rtn[0].formatted_address;
      }
    );
  }

  public setTrafficLayer() {
    this.trafficSwitch = 1 - this.trafficSwitch;
  }
}
  • src/app/app.component.html
<form #f="ngForm" (ngSubmit)="geocoding(f)" novalidate>
  <input type="text" name="address" placeholder="場所を入力してください...(例:品川駅)" ngModel>
</form>
<div class="address-panel">{{ address }}</div>
<div class="trafficButton" (click)="setTrafficLayer()">Set Traffic Layer</div>
<sebm-google-map [latitude]="lat" [longitude]="lng" [zoom]="zoom">
  <sebm-google-map-marker [latitude]="lat" [longitude]="lng"></sebm-google-map-marker>
  <map-content #map [trafficSwitch]="trafficSwitch"></map-content>
</sebm-google-map>
  • src/components/map/map-content.component.ts
import { Component, Input } from '@angular/core';

import { GoogleMapsAPIWrapper } from 'angular2-google-maps/core';

declare var google: any;

/**
 * MapContentComponent
 * 
 * @export
 * @class MapContentComponent
 */
@Component({
  selector: 'map-content',
  template: ''
})
export class MapContentComponent {
  private trafficLayer: any;

  @Input() public set trafficSwitch(trafficSwitch: number) {
    this.trafficToggle(trafficSwitch);
  }

  /**
   * Creates an instance of MapContentComponent.
   * 
   * @param {GoogleMapsAPIWrapper} mapApiWrapper
   * 
   * @memberOf MapContentComponent
   */
  constructor(
    private mapApiWrapper: GoogleMapsAPIWrapper,
  ) {
    // none
  }

  /**
   * Set traffic layer
   * 
   * @param {number} state
   * 
   * @memberOf MapContentComponent
   */
  public trafficToggle(state: number) {
    let self = this;
    this.mapApiWrapper.getNativeMap()
      .then((map) => {
        self.trafficLayer = self.trafficLayer ? self.trafficLayer : new google.maps.TrafficLayer();
        let targetMap = state === 1 ? map : null;

        self.trafficLayer.setMap(targetMap);
      });
  }

}

GoogleMapsAPIWrapperのgetNativeMap()を呼び出して、mapオブジェクトを取得しているところがポイント

デモアプリケーションは、下記URLに格納してます。

github.com

参考サイト

waox.main.jp

angular2-google-mapsでリバースジオコーディング

イントロ

前回の記事で作成した、angular2-google-mapsのデモアプリに、リバースジオコーディングのデモを追加した。

開発環境

  • Angular@2.4.1

  • angular2-google-maps@0.17.0

  • typescript@2.0.10

リバースジオコーディングとは

本ブログでは、緯度、経度から住所を算出することを指しています。

リバースジオコーディングのデモ

  1. Google Mapの中心の座標(緯度、経度)を取得

  2. 座標を住所に変換(リバースジオコーディング)

  3. 住所を白枠内に表示

f:id:l08084:20161229204827p:plain

ソースコード

  • src/app/app.component.ts
import { Component, OnInit } from '@angular/core';
import { NgForm } from '@angular/forms';
import { MapService } from '../services/map.service';

@Component({
  selector: 'app-root',
  templateUrl: './app.component.html',
  styleUrls: ['./app.component.css']
})
export class AppComponent implements OnInit {
  lat: number = 35.6329007;
  lng: number = 139.8782003;
  zoom: number = 15;
  address: string = '';

  constructor(
    public mapService: MapService,
  ) {}

  public ngOnInit() {
    this.getAddress();
  }

  public geocoding(f: NgForm) {
    let self = this;

    this.mapService.geocoding(f.value.address).then(
      rtn => {
        let location = rtn[0].geometry.location;

        self.lat = location.lat();
        self.lng = location.lng();

        // call reverse geocoding
        self.getAddress();
      }
    );
  }

  public getAddress() {
    let self = this;

    this.mapService.reverseGeocoding(this.lat, this.lng).then(
      rtn => {
        self.address = rtn[0].formatted_address;
      }
    );
  }
}

getAddress()で、mapServiceクラスに座標を渡して、結果の住所情報を受け取っている。

  • src/services/map.service.ts
import { Injectable } from '@angular/core';

import { MapsAPILoader } from 'angular2-google-maps/core';

declare let google: any;

@Injectable()
export class MapService {
    private geocoder: any = null;

    constructor(
        private mapsAPILoader: MapsAPILoader,
    ) { }

    public geocoding(address: string): Promise<any> {
        return this.mapsAPILoader.load().then(() => {
            this.geocoder = new google.maps.Geocoder();

            return new Promise((resolve, reject) => {
                this.geocoder.geocode({ 'address': address }, (result: any, status: any) => {
                    if (status === google.maps.GeocoderStatus.OK) {
                        resolve(result);
                    } else {
                        reject(status);
                    }
                });
            });
        });
    }

    public reverseGeocoding(lat: number, lng: number): Promise<any> {
        let latlng = { lat: lat, lng: lng };

        return this.mapsAPILoader.load().then(() => {

            this.geocoder = new google.maps.Geocoder();
            return new Promise((resolve, reject) => {
                this.geocoder.geocode({ 'location': latlng }, (result: any, status: any) => {
                    if (status === google.maps.GeocoderStatus.OK) {
                        resolve(result);
                    } else {
                        reject(status);
                    }
                });
            });
        });
    }

}

reverseGeocoding()で、リバースジオコーディングの処理を実施している

  • src/app/app.component.html
<form #f="ngForm" (ngSubmit)="geocoding(f)" novalidate>
  <input type="text" name="address" placeholder="場所を入力してください...(例:品川駅)" ngModel>
</form>
<div class="address-panel">{{ address }}</div>
<sebm-google-map [latitude]="lat" [longitude]="lng" [zoom]="zoom">
  <sebm-google-map-marker [latitude]="lat" [longitude]="lng"></sebm-google-map-marker>
</sebm-google-map>

デモアプリケーションは、下記URLに格納してます。

github.com

angular2-google-mapsでジオコーディング

最近仕事でGoogle Map周りを触ることが多いので、下記ライブラリを使って、ジオコーディング処理のデモアプリを作成してみた。

github.com

開発環境
  • Angular@2.4.1
  • angular2-google-maps@0.17.0
  • typescript@2.0.10

ジオコーディングとは

Google Maps API公式サイトによると、住所を地理的座標(緯度、経度)に変換する処理とのこと。

ジオコーディングデモアプリ概要

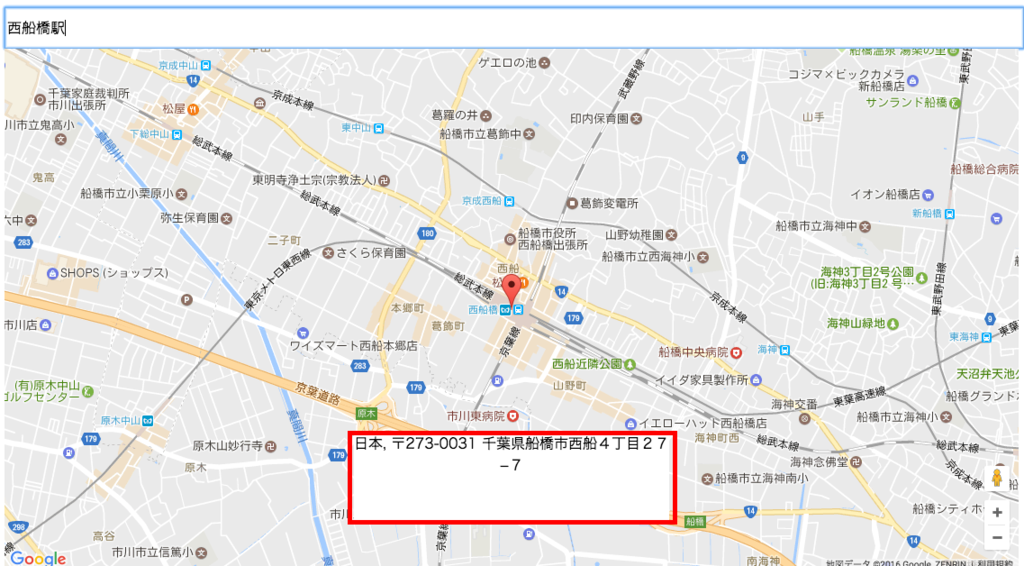
入力した場所情報をジオコーディングで緯度と経度に変換後、GoogleMapに渡すといった処理をAngularを使って書いている。

GoogleMapで表示したい場所をテキストボックスに入力してEnterすると。。。
f:id:l08084:20161229160340p:plain

GoogleMapの中心が、テキストボックスに入力した地点に移動する。という仕様
f:id:l08084:20161229160450p:plain

デモアプリソースコード解説

angular2-google-mapsの導入方法は、公式サイトのGetting Startedがわかりやすいので割愛する。

  • src/app/app.component.ts
import { Component } from '@angular/core';
import { NgForm } from '@angular/forms';
import { MapService } from '../services/map.service';

@Component({
  selector: 'app-root',
  templateUrl: './app.component.html',
  styleUrls: ['./app.component.css']
})
export class AppComponent {
  lat: number = 35.6329007;
  lng: number = 139.8782003;
  zoom: number = 15;

  constructor(
    public mapService: MapService,
  ) {}

  public geocoding(f: NgForm) {
    let self = this;

    this.mapService.geocoding(f.value.address).then(
      rtn => {
        let location = rtn[0].geometry.location;

        self.lat = location.lat();
        self.lng = location.lng();
      }
    );
  }
}

テキストボックスに入力した場所情報を、MapServiceに渡した後、MapServiceからジオコーディング結果として渡された緯度と経度を受け取り、HTML上のGoogleMapに渡している。

  • src/app/app.component.ts
<form #f="ngForm" (ngSubmit)="geocoding(f)" novalidate>
  <input type="text" name="address" placeholder="場所を入力してください...(例:品川駅)" ngModel>
</form>
<sebm-google-map [latitude]="lat" [longitude]="lng" [zoom]="zoom">
  <sebm-google-map-marker [latitude]="lat" [longitude]="lng"></sebm-google-map-marker>
</sebm-google-map>
  • src/services/map.service.ts
import { Injectable } from '@angular/core';

import { MapsAPILoader } from 'angular2-google-maps/core';

declare let google: any;

@Injectable()
export class MapService {
    private geocoder: any = null;

    constructor(
        private mapsAPILoader: MapsAPILoader,
    ) { }

    public geocoding(address: string): Promise<any> {
        return this.mapsAPILoader.load().then(() => {
            this.geocoder = new google.maps.Geocoder();

            return new Promise((resolve, reject) => {
                this.geocoder.geocode({ 'address': address }, (result: any, status: any) => {
                    if (status === google.maps.GeocoderStatus.OK) {
                        resolve(result);
                    } else {
                        reject(status);
                    }
                });
            });
        });
    }

}

・src/app/app.module.ts

import { BrowserModule } from '@angular/platform-browser';
import { NgModule } from '@angular/core';
import { FormsModule } from '@angular/forms';
import { HttpModule } from '@angular/http';
import { AppComponent } from './app.component';

import { AgmCoreModule } from 'angular2-google-maps/core';

import { MapService } from '../services/map.service';

@NgModule({
  declarations: [
    AppComponent
  ],
  imports: [
    BrowserModule,
    FormsModule,
    HttpModule,
    AgmCoreModule.forRoot({
      apiKey: 'YourAPIKey'
    })
  ],
  providers: [
    MapService,
  ],
  bootstrap: [AppComponent]
})
export class AppModule { }

mapsAPILoader.load()を使用すると、「google is not undefined〜」的なエラーが発生しないので良いです。

作成したデモアプリは、Githubにあげているので、取得したGoogle mapsのAPIKEYを設定すれば動かすこともできます。

手順
  1. GoogleMapのAPIKEYを取得して、src/app/app.module.tsに設定
  1. npm installコマンド実施
  1. ng serveコマンド実施
  1. ブラウザを開いて、http://localhost:4200/ を入力する


github.com

参考サイト

github.com

mae.chab.in

NOTエンジニアPC(Windows7)にIonic2を入れる

開発に使っていないPCにIonic2を入れようとしたら、時間がかかったので、つまづいた部分をメモ。

開発環境

  • OS: Windows7 64bit
  • Ionic version: 2.0.0-beta.11
  • Ionic CLI version: 2.0.0

Ionic2環境構築手順

  1. Node.jsのインストール
  2. Gulp、Typingsのインストール
    npm install -g gulp typings
  3. Ionic2とCordovaのインストール(Ionicは諸事情により古いバージョン)
    npm install -g ionic@2.0.0 cordova
  4. 過去にIonic2で作成したプロジェクトに移動して、ライブラリをインストール
    npm install
  5. Ionicアプリを起動
    ionic serve

つまづいた点

  • 手順4のnpm installで下記2点のエラーが発生
    • Python2.7が見つかりません
    • WindowsSDK8.1が見つかりません
      error MSB8036: The Windows SDK version 8.1 was not found. Install the required version of Windows SDK or change the SDK version in the project property pages or by right-clicking the solution and selecting "Retarget solution".

対応策

  • Python2.7が見つかりません

    1. Python2.7.xをダウンロードしてインストール(環境変数も設定)
    2. コマンドプロンプトでnpm config set python python2.7を実行
    3. npm config listで正常に設定されていることを確認
  • WindowsSDK8.1が見つかりません

    1. Visual Studio 2015がインストール済みの場合、Visual Studioのアンインストールが必要
    2. VC++ Build Tools Technical Previewのインストールを実施
    3. カスタムインストールを選択してWindows 8.1 SDKWindows 10 SDKのチェックを入れる
    4. コマンドプロンプトを起動してnpm config set msvs_version 2015 --globalを実行
    5. npm config listで正常に設定されていることを確認

http://landinghub.visualstudio.com/visual-cpp-build-toolslandinghub.visualstudio.com

参考サイト

overmorrow.hatenablog.com

TypeScript2.0.2 + Visual Studio Codeの設定メモ

qiita.com

エラーが発生しちゃったので、自分用にメモ。

エラー内容

Angular2に入門しようと、上記サイトを見ながらVSCodeで写経をしていたら下記エラーが発生。

Experimental support for decorators is a feature that is subject to change in a future release. Specify '--experimentalDecorators' to remove this warning.

実行時には上記エラーは発生せず、VSCode上でのみエラーが表示される状態だったので、TypeScript向けの設定をVSCodeにしていないのが原因なんだろうな〜という感じ。

開発環境

  • Visual Studio Code: 1.5.3
  • TypeScript: 2.0.2

解決手順

ググったら、解決方法がわかったので、以下に列挙。

  • tsconfig.jsonに"experimentalDecorators": trueを追記
// tsconfig.json
{
  "compilerOptions": {
    "declaration": false,
    "emitDecoratorMetadata": true,
    "experimentalDecorators": true,
    "lib": ["es6", "dom"],
    "mapRoot": "./",
    "module": "es6",
    "moduleResolution": "node",
    "outDir": "../dist/out-tsc",
    "sourceMap": true,
    "target": "es5",
    "typeRoots": [
      "../node_modules/@types"
    ]
  }
}
  • VSCodeのユーザ設定でtypescript.tsdkのパスを指定
    typescript.tsdkのパスは、Visual Studio Codeの [Code]->基本設定->ユーザ設定 で設定可。
// settings.json
// 既定の設定を上書きするには、このファイル内に設定を挿入します
{
    "typescript.tsdk": "node_modules\\typescript\\lib"
}

参考サイト

stackoverflow.com

qiita.com